
Exercise is one way to ensure that your body is functioning properly. There are so many benefits people enjoy just from some few minutes of regular exercise. – Set Up a Home Gym
You can visit https://www.mayoclinic.org/ to find out some benefits of exercising. For some persons, a walk is all they need to get these benefits. But for others who love going the extra mile to give their bodies these benefits, a gym is a must.
But going to the gym is sometimes stressful. You’d have to leave home and then walk or even drive back home after spending several minutes or hours exerting the body. Let’s not even talk about the membership fees that have to be paid. A home gym will take away all these problems.
If you’ve been thinking of turning your basement into a home gym, we say it’s time to stop thinking and get doing. It’ll only appear daunting when you look at it from the surface. But once you start it, you’d realize it wasn’t as hard as you thought. What’s more? We are here to guide you through the whole process step by step.
Table of Contents
Step 1: Clear Out the Space
The first thing you have to do is make sure that the space will be comfortable enough for you to love working out in it. If the space is uninviting with a lot of clutter and unwanted items in it, you may not feel enthusiastic about working out there even if it has your favorite pieces of equipment in it. So, start decluttering.
- Give out items you no longer want to people you know that need them. You can also donate them to charity if you don’t know people to give them to.
- Relocate items you want to keep to another part of your home like your garage or attic. You can also divide the basement into two if it is large enough. One part will be the gym while the other part can house the things you still want to keep.
- Items that are damaged and can’t be donated should be thrown out.
Step 2: Unfinished Vs. Finished Basement
If your basement is finished (that means you’ve installed drywall, insulation, and carpet in it), then some of the fixtures and furniture have to be removed to make space for the gym equipment.
If you have an unfinished basement, then you are at an advantage because you will be finishing the basement with a gym design in mind. However, ensure you do the following first:
-
- Make sure the basement is waterproof
- If there are cracks in the flooring and concrete walls, repair them. You may have to contact a professional in this case so that they can determine the severity of the crack.
- Remove pests and mold from the space if any is found. Removing molds can be an issue as they can spread or keep coming back when not done correctly. So, read this article to learn how to remove mold from your home and ensure you wear protective clothing all through the process.
Step 3: Flooring – Set Up a Home Gym
Some people just clear out their basement and then drag in some equipment and start working out without even considering the flooring. However, this isn’t advisable. While you can choose to work out on your carpeted or bare concrete floor, it isn’t a good choice for both your comfort and safety.
If your basement has been finished with tile or carpet before now, you may need to get them removed so that the proper flooring for a gym can be installed.
The following are some common materials people use for their home gym floorings:
1. Rubber Mats
This flooring option is versatile and offers good shock absorption while supporting even heavy equipment. They are made as interlocking tiles or rollable mats, so installing them is quite easy. However, they are costlier than the other options on our list.
2. Vinyl Panels
If you need your floor to be presentable while still providing you with enough shock absorption, then this may be the ideal choice for you. However, its level of durability can’t be compared with that of rubber mats. But it’s easier to maintain and clean. If you choose this option, you would also need to get yoga mats for floor or stretching exercises.
3. Foam Tiles
This option is best suited for exercises that don’t create many impacts like Pilates and yoga. It may not support heavy equipment such as weight benches.
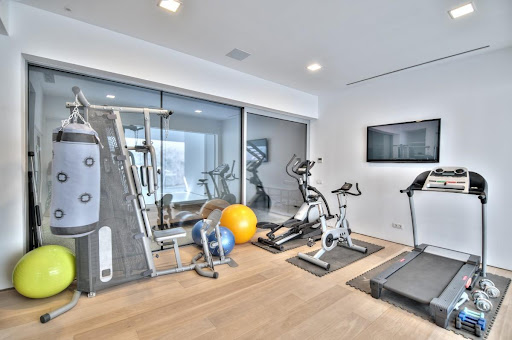
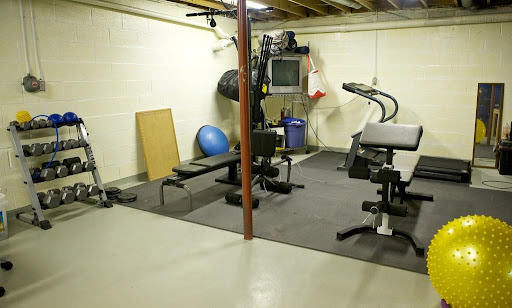
Step 4: Bring In the Gears- Set Up a Home Gym
You need to now consider the pieces of equipment you need in the gym and then bring them in. The equipment you choose should be based on your workout goals. These are some popular equipment found in most average home gyms:
- Punching bags
- Rower
- Stationary bike
- Treadmill
- Stair climber or elliptical
- Bench press or weight rack
Step 5: Set Up the Aesthetic- Set Up a Home Gym
The aesthetic appeal of your basement-turned home gym is another thing that will make you enjoy your workout sessions. When aesthetics that you love are used to decorate the gym, you’d be motivated to spend time there.
Below are some things that you can consider in this regard:
- Overhead lighting.
- Decorate your walls with inspirational arts, murals, photos, and so on.
- Add some mirrors. This would not just add beauty to your space, you can check out your improvements, and who doesn’t like gym selfies?
- Get a speaker or sound system; music during a workout session can be all the motivation you need.
- If you have enough space, then you can set up a hydration station; all you need for this is a mini-fridge.
Congratulations, your home gym is set. If you still need some home gym ideas, then Home Gym Mania has several ideas and styles that you can learn about and choose from.
Also, the fact that you have successfully set up your gym doesn’t mean you don’t have to maintain it. Hence, always keep it clean and organized to ensure it maintains an ambiance that will keep you motivated.
Conclusion
Transforming your basement into a gym can be done in 5 steps. All you need to do is clear up the basement, finish it if it isn’t finished, install new flooring that can withstand impact, add a few aesthetic touches, and then bring in your gear.
Once you are done with the steps and setup, just don’t admire your new gym; get to work…